

Introduction:
The Society of New Concord acquired the two wooden buildings at 2689 County Route 9 from the Dutch Reformed Church in October 2011. After a heating failure and resulting water pipe fracture, extensive damage to the Community Hall led us to gut, reframe, rewire, replumb, and re-sheetrock the building. We went on to replace the windows and interior doors, connect the two buildings, making them both handicap accessible. New lighting, water heater, bathroom, flooring, and kitchen were also installed.
It was a remarkable cooperative effort by many generous and skilled neighbors. The renovation of the two buildings seems endless, but it is now quite habitable up to a point. This manual is therefore also a work in progress, but will be useful for various community members who may use or deal with the building and its fixtures.
Sections:
Electrical
Plumbing
Heating
Security
Paint
Foundations
Procedure Check Lists
Appendices and Manuals
Electrical
The buildings have three-phase, 200-amp service via a new meter installed by Mike Swift in March 2013.
There is no telephone or internet service.
Electrical service is routed through two breaker panels, the primary one in the Community Hall kitchen, and a secondary- or sub-panel in the Southeast storage room of the Meeting House. The secondary panel is fed via a buried conduit from the East face of the Community Hall to the South face of the Meeting House, running just outside the drip line of the MH roof.
All lights, appliances, outlets, pumps, heaters, etc. in the Community Hall are wired through the Primary Panel, using heavy-gauge (MC12-2) metal-shielded (rodent-proof) cable. All lights except the storage closet (CFL), are LEDs. See panel layout and listing below.
Things are less clear in the Meeting House: older wiring is run through the secondary panel, but certain circuits [cove LED strips, pendant strips, ceiling fans] are run from (two 15-amp breakers in) the primary panel through Romex (NM) cables routed through the kitchen, closet, hallway and Meeting House ceilings. See panel layout and listing below.
In the Community Room, ceiling panels and wall sconces are dimmable by switches to the North of the entry door. Higher amperage service is available via the outlets along the North wall (specifically intended for crock-pots, coffee makers, hot-plates, etc.).
The kitchen ceiling exhaust fan is controlled by a timer switch adjacent to the doorway. The (non-venting) range hood is controlled by switches on the hood itself.
The closet CFL light is on a motion sensor and will turn off on its own when the door is closed.
The bathroom lights and exhaust fan are controlled by a single motion sensor switch. Fan and lights will turn off when the room is unoccupied. The toilet will not flush itself.
Meeting Room lighting system consists of four pendant fixtures and two wall channels; these contain 24-volt dimmable Tunable-white LED strips. The strips are regulated by seven Eulum controllers [NDRV-CSB-48C1-4] each fed by a Mean Well power supply. The controllers run a Casambi low-power BlueTooth Low Energy [BLE] wireless network which can be controlled by a Casambi XPress wall switch in the Robing room or by a smart phone running the Casambi app. There is a master switch (with pilot light) for this system—also in the Robing room.
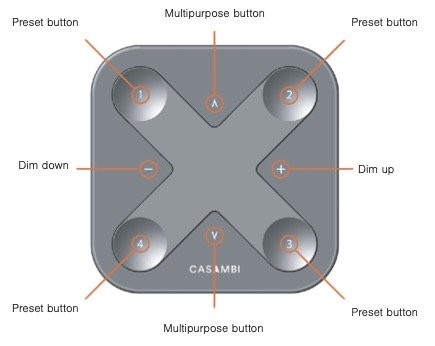
Preset 1: Standard general lighting
Preset 2: Cozy lighting
Preset 3: Downlights only
Preset 4: Bright white work lights
Multiporpose buttons (∧, ∨) change color of lights;
Dim (+, -) buttons change brightness of lights;
For these 4 controls, tap once to change to full bright/fully off/brightest white/warmest color; push and hold for smooth dimming/smooth color change.
Push and hold (10 secs) any numbered button to turn all lights off.
Outdoor lighting:
There is an overhead set of floodlights above the CH door and two floodlights for the field to the south of the CH
On either side of the CH (yet to be installed) and MH doors is an LED facade-lighting fixture.
There is an Edison-socket light (currently with an LED bulb) mounted on the Southeast corner of the MH.
There is a conduit to the SNC signpost carrying 24v service to two LED strip lights for the sign. These lights are on a timer switch (in the robing room) that turns the lights on at sundown (changes each day, and does understand Daylight-Saving-Time) and off at 9 pm.
There are mounting points for outdoor lights over the handicap ramp; we own three LED fixtures, but they remain uninstalled.
There are LED downlights over the steps into both buildings; each is controlled by a timer switch. The switch allows you to illuminate the steps while you lock the door and exit the building without breaking your neck. There are five buttons on these switches: 10, 20, 30, 60 minutes, off; push the 30 minute button, for example, and the light will turn on immediately--but go off after 30 minutes. You can turn the light on with no time limit by pushing and holding the 60-min button until all the little green lights flash; turn the lights off by pushing any one of the timer buttons, or the off button.
Plumbing
All of the plumbing is newly installed by Steve Hughes during the major renovation of 2013.
The plumbing is concentrated in a very small area in the Community Hall: West wall of the bathroom; bathroom utility closet; East wall of the kitchen.
There is no plumbing in the Meeting House.
There is a dishwasher, stainless-steel kitchen sink with single-lever faucet, bathroom toilet, bathroom lavatory sink; utility closet pressure valve, pressure well tank (blue); there is a wall-mounted on-demand tankless electric hot water heater in the utility closet, and a flushable grit filter in the line from the well (also utility closet).
There is an outdoor spigot on the East face of the Community Hall
The system is designed to be largely drained when the building is unheated.
There is a submersible pump in the well; and it has a drain-back system installed in the line from the pump to the storage tank so that the line empties back into the well and doesn’t freeze during the Winter. The previous reconditioned submersible well pump failed in October 2018 and was replaced with a new (not reconditioned) one.
In September 2017, a new septic system was installed, consisting of a plastic 500-gallon septic tank, a down-slope distribution box, and three perforated distribution pipes in a gravel filled field in the southwest corner of the property. The septic tank is connected to the house sewer with a long and slanted 4” plastic pipe. Downstream connections are also 4” plastic pipe.
Well pump, Tankless water heater, and Dishwasher are controlled using breakers in the main breaker box (kitchen).
There are four drain traps in the system (which require RV antifreeze during no-heat season): toilet, lavatory, kitchen sink, dishwasher. The grit filter also needs to be emptied in no-heat season.
Draining the plumbing system requires use of valves:
under the kitchen sink,
under the blue pressure well tank,
below the tankless hot water heater
at the outdoor spigot,
at the grit filter
and under-the-toilet cold water feed.

Valve open

Valve Closed
Heating
There is an oil-fired heater for the Community Hall, located in the crawl space under the South end of the Community Room, and a separate one for the Meeting House, located in the Northeast corner access room (also access to the bell tower).
There is no air conditioning.
An AirScape Ventura 5300 ultra-quiet exhaust fan for the Meeting House is installed in a vibration-damped plywood plenum through the west gable-end of the building; it is connected by 20-inch diameter flex duct to a grill in the Meeting Room ceiling.
Electronic controls [fan speed (1-10) and timer duration in hour increments] are in the robing room (SW corner); there is also a master switch for the fan electronics (with pilot light) also in the Robing room. The fan will run until the timer runs down, or until the speed is manually turned to zero.
The fan is strong enough that opening the windows in the south end of the Community Hall will allow it to draw fresh air completely through both buildings.

Community Hall
In the CH, warm air is supplied through duct gratings in the kitchen and bathroom floors, and through gratings along the long walls of the Community Room. The gratings near the short walls of the Community Room are air returns.
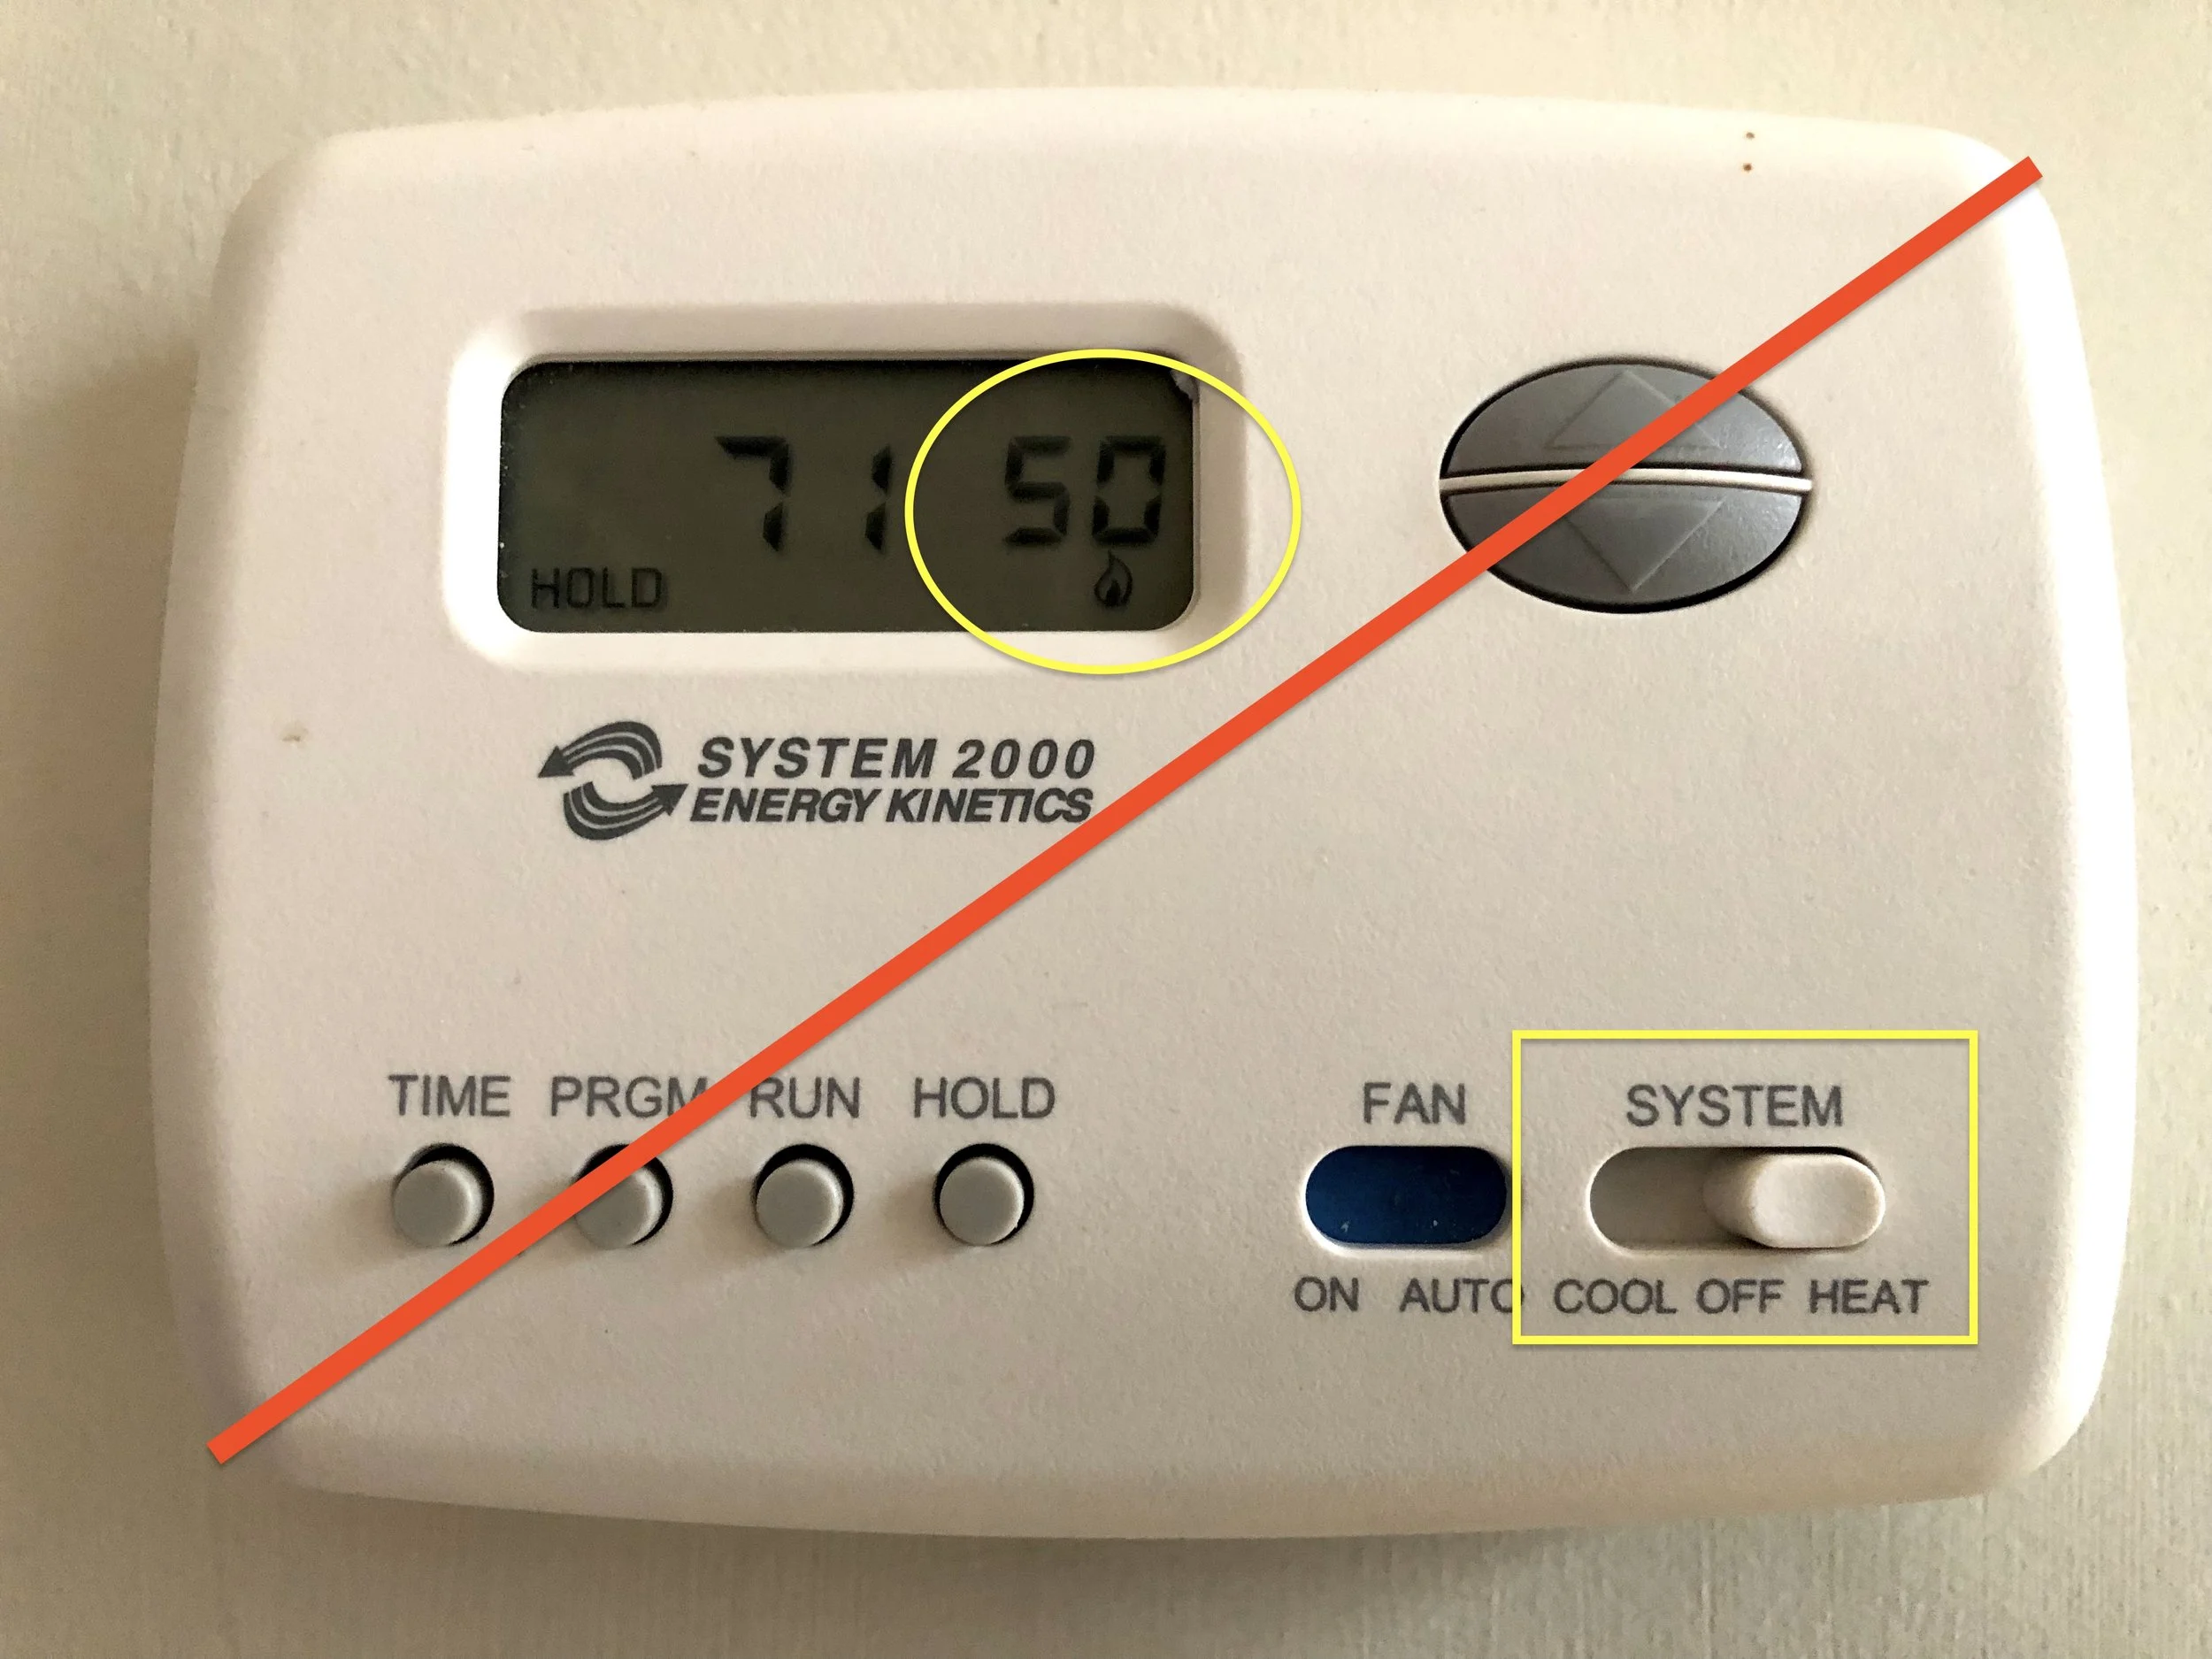
The Community Hall heater is controlled by the thermostat in the North wall of the Community Room. The slider switch at the lower right corner of the thermostat turns the boiler on and off. The current room temperature is shown on the left of the screen; the set temperature is shown on the right. The set temperature is changed by using the blue “up” and “down” buttons to the right of the screen. The buttons on the lower left face of the unit should not be used. Thermostat function depends on two AAA batteries (which don't function well without full charge in low temperatures. If the display is blank, replace the batteries).
Meeting House
In the MH, heated air is supplied through three duct gratings in the Meeting House East wall (above the doors), through the circular grating in the ceiling, and through a small grating in the entry vestibule. The gratings in the floor are all returns.
The Meeting House heater is turned off and on via a grey industrial disconnect blade switch, mounted on the wall to the right of the door to the furnace room. Furnace is “on” when the arm is pushed up, “off” when the arm is down. The temperature setting is governed by a round Honeywell thermostat mounted on the North wall of the Meeting Room.
There are two ceiling fans in the Meeting House, controlled by a rotary switch high in the North wall of the Southeast storage room. During heating season, the fans (set on slow) play an important role in pushing the warm air trapped near the ceiling down onto the audience.
Fuel/Service
We have no contract with any fuel oil suppliers, nor with any heating/cooling contractors. The (newer) heater in the Community Hall has been quite cantankerous, but has behaved after adjustments done by Matt Larabee. [Four previous “experts” failed to make the heater work more than a single day at a time]
Each boiler has its own separate fuel tank; both require winter mix (which can withstand freezing temperatures)--not regular heating oil.
Security
Locks
There are locks on the entry doors to the Community Hall and the Meeting House and a deadbolt on the door to the wheelchair ramp. All three locks are keyed-alike, so entry through any of the doors is possible with a single key.
Smoke/CO detectors
There are hard-wired smoke/CO detectors on the North wall of the Community Room and the West wall of the Meeting Room. They are not connected to external monitoring services, but serve to alert both rooms in the event of suspected fire or CO buildup to allow safe exit of a gathering. The units should be tested regularly. They were replaced in late 2018 because of manufacturer's recall
Emergency Exit signs/lighting
There are lighted Emergency Exit signs per code at all building exits. Each sign incorporates emergency lighting in the event of power loss. The emergency lighting can be tested by turning off the electricity to the circuit, or by depressing the test switch on the left edge of the unit.
Paint
| Manufacturer | Color | Code | Finish | Application |
|---|---|---|---|---|
| Benjamin Moore | Tapestry Beige | OC-32 | Pearl | Walls in Community Room and Connecting Hallway walls and ceiling; sconces; CH vestibule walls |
| Benjamin Moore | Barren Plain | 2111-60 | Semi-Gloss | Kitchen walls and ceiling; Bathroom walls and ceiling Closet walls and ceiling |
| Sherwin Williams | Integrity Interior White | N1 2/32 +1/64 oz | Satin | Window sills and trim, door frames, doors: Community Room, CH vestibule, kitchen, bathroom, closets Community Room Ceiling surround and grid of battens Baseboards Kitchen cabinet doors and faces |
| Benjamin Moore | Sea Shell??? | OC-120 ?? | ? | Ceiling coffer panels (to which light fixtures and sound panels are attached) |
| Benjamin Moore | custom | Semi-Gloss ? | Meeting House door trim, stage base | |
| Benjamin Moore | Tapestry Beige | OC-32 | Pearl | |
| Benjamin Moore | Tapestry Beige | OC-32 | Pearl | Walls in Community Room and Connecting Hallway walls and ceiling; sconces; CH vestibule walls |
| Benjamin Moore | Linen White | Pearl | Meeting House walls, trim, doors; MH vestibule trim, doors | |
| Ceiling white | Meeting House and MH vestibule ceiling; Community Hall vestibule ceiling |
Foundations:
The Meeting House foundation is made of rough stones, mortared together in some places. There are a few aluminum louvers to allow air circulation. The floor is laid on rough timbers which in turn sit on the ground. This very shallow air space is traversed by heating system return ducts. There are no electrical conduits and no plumbing.
The Community Hall foundation is constructed of concrete blocks, and it encompasses a dirt-floored crawl space, which is very shallow on the North end, but tall enough on the South end to accommodate the oil burner. The crawl space is traversed by plumbing lines (line from well to storage tank), and drain lines (sinks to septic system). There are innumerable electrical cables from the main breaker panel, as well as the (buried) cable to the secondary panel in the Meeting House storage room. There is also an unshielded wire from the thermostat to the oil-fired boiler.
CH vestibule has a concrete block foundation tied into the main Community Hall foundation. The CH entry steps have a sturdy foundation of concrete blocks tied into the vestibule foundation. Within the vestibule foundation is a massive concrete pouring which is used as a base for pressure-treated wood floor supports.
There are plans to cover the ground with a membrane in order to decrease humidity exposure for the underside of the main floor, and plans for a low flow ventilation system (exhaust fan).
There is a functioning church bell (cast in Troy, NY, 1850); it is operated with a stout rope that leads from the ceiling in the MH entry vestibule.
Procedures
Pre-Event Check List (above-freezing weather)
☐ Turn on heater(s) as needed; even in 30-degree weather, the buildings warm up relatively quickly, and will attain comfortable room temperature within hours
☐ Use ceiling fans low-speed if MH heater is to be used
☐ Turn on well pump (breaker panel in kitchen)
☐ Turn on Tankless hot water heater only after pump is turned on and pressure is up to 40 psi (breaker panel in kitchen)
Post-Event Check List (above-freezing weather)
☐ Turn off Tankless hot water heater at breaker panel
☐ Be sure toilet is flushed and both sinks are clean
☐ Turn off well pump
☐ Turn off both heaters (CH and MH)
☐ Turn off MH ceiling fans
☐ Turn off ovens/cooktop/range hood/dishwasher
☐ Make sure all windows are closed (bathroom, too) and locked
☐ Remove trash from the premises
☐ Be sure no perishables (e.g. milk, cream, cider, leftovers) are left in the refrigerator
☐ Turn off all lights
☐ Lock doors
Pre-Event Check List (freezing season)
☐ Turn on heater(s) as needed; even in 0-degree weather, the buildings warm up relatively quickly, and will attain comfortable room temperature within hours; it may be necessary to start up heating the evening before a daytime event, or the morning of an evening event: set the thermostat to 50-degrees during warm up, then adjust to 60 or 65 just before event. Remember, body head of a lot of people will rapidly make a closed room too warm—even in Winter.
☐ Use ceiling fans low-speed if MH heater is to be used
☐ Close drain valves (☐-under toilet feed, ☐-below blue storage tank, ☐-below water heater, ☐-below kitchen sink: hot water [red tubing], ☐-below kitchen sink: cold water [blue tubing]
☐ Turn on well pump (breaker panel in kitchen)
☐ Turn on Tankless hot water heater only after pump is turned on and pressure is up to 40 psi or greater (breaker panel in kitchen)
☐ Close bathroom sink faucets; close kitchen faucet
☐ Flush toilet
☐ Turn on Dishwasher circuit breaker—if it needs to be used
Post-Event Check List (freezing season)
☐ Turn off both heaters (CH and MH)
☐ Turn off MH ceiling fans
☐ Turn off Tankless hot water heater at breaker panel
☐ Be sure toilet is flushed and both sinks are clean
☐ Turn off well pump at breaker panel
☐ Open bathroom sink faucets
☐ Open kitchen faucet: handle up and centered (so both hot and cold lines are open to air)
☐ Flush toilet again and hold to be sure tank is empty and that bowl contains minimum water
☐ Open cold water feed line drain (under toilet)
☐ Open hot (red hose) and cold (blue) feed line drains under kitchen sink
☐ Open drain valve under Blue water tank; be sure outside faucet spigot is open
☐ Blow out hot water heater with compressor, use Water Heater blowout procedure (below)
☐ Winterize dishwasher, use Dishwasher winterization procedure (below)
☐ Pour RV (pink) antifreeze in kitchen sink drain, 2 cups
☐ Pour RV antifreeze in bathroom sink drain, 2 cups
☐ Pour RV antifreeze in toilet tank (remainder of gallon); flush and hold until tank is empty
☐ Turn off ovens/cooktop/range hood/dishwasher
☐ Make sure all windows are closed (bathroom, too) and locked
☐ Remove trash from the premises
☐ Be sure no perishables (e.g. milk, cream, cider, leftovers) are left in the refrigerator or anywhere else
☐ Turn off all lights
☐ Lock doors
Water Heater Blowout Procedure
The tankless Stiebel-Eltron electric on-demand water heater contains two U-shaped heating chambers; these can effectively act as drain-traps, holding water—even when the rest of the system is drained—which can freeze in below-zero conditions. Compressed air is used to blow the residual water out of these circuits when the plumbing system is emptied.
☐ Drain valve below water heater is open during normal use and when system is drained
☐ Temporarily close the valve below the water heater
☐ Attach a compressor to the tire stem valve just below the water heater
☐ Run compressed air (at about 40 psi) into the valve until a whirring turbo noise can be heard from the heater; repeat a few times
☐ Remove compressor
☐ Reopen the drain valve
Dishwasher Winterization Procedure
After water supply is turned off everywhere, and machine is empty of dishes,
☐ Pull white hose from the kickspace under the kitchen sink and open the valve to drain the water-feed line to the dishwasher; leave the valve open onto the floor, with a sponge
☐ Pour 3 cups RV (pink) antifreeze into bottom (basin) of dishwaser and run a RINSE cycle:
Push ON button
Select Rinse (9 minutes)
Push START
Close door
☐ Dishwasher will start working and then start beeping a minute or two into the cycle, but will continue to run (indefinitely)
☐ After 10 (timed) minutes open washer door and leave it ajar (pull out top rack a little)
☐ Turn off circuit breaker (#11)
☐ Close white hose drain valve and tuck the hose away under the sink kickspace
Appendices (Details/Manuals)
Primary Panel
No
Description
Amp
Amp
Description
No
1
Cable to Meeting House sub-panel
50
20
Community Room West outlets
2
3
50
20
Community Room North outlets
4
5
Well water pump
20
15
Community Hall vestibule
6
7
20
15
Furnace
8
9
Kitchen lights and fan
15
20
Community Room East outlets
10
11
Dish washer
20
20
Community Room ceiling lights, sconces, Exit sign
12
13
Hallway and ramp lights, Meeting House West outlets, ramp and connector Exit signs
15
20
Bathroom, closets lights, fan and GFI
14
15
blank
0
50
Tankless water heater
16
17
Refrigerator and West GFI
20
50
18
19
Meeting House cove fluorescents
15
50
20
21
Meeting House cove fluorescents, ceiling fans
15
50
22
23
Cooktop
30
40
Double Oven
24
25
30
40
26
27
Kitchen counter outlets and South GFI
20
Secondary Panel
No
Description
Amp
Amp
Description
No
1
Meeting House Furnace
15
30
Pendant incandescents, furnace room outlet, storage room light
2
3
Stage front outlet, stage lights, vestibule light, outdoor light (SE corner)
15
30
4
5
15
Mechanical timer switch to out-door lights on signpost
6
7
8
Need: outdoor sign timer and light; furnace room light (other outlets)
Tankless water heater manual
Pump pressure tank manual
Bathroom occupancy sensor switch manual
Pixi ceiling panels manual
Bosch dishwasher user manual
Broan range hood user manual
Frigidaire double wall oven user manual
GE electric cooktop manual
Dimmer switch (CH) manuals
Smoke/CO detector manual